I recently deployed my very own django application to production. The website is called videiro.com and was developed in django + HTML/CSS/JS + Tailwind.
Setup
I am using a debian 12 server which will expose my application via cloudflare tunnels. All of the static files are being served via nginx and the Django project is being ran by gunicorn.
In this guide I will show you how I set this up.
Preparing the Django project
The first thing you will have to do is open the settings.py and change the following
Debug = False
ALLOWED_HOSTS = ['yourdomain.tld']
CSRF_COOKIE_SECURE = True
CSRF_TRUSTED_ORIGINS = [
    'yourdomain.tld',
]
You should also change the SECRET_KEY to a long random string, that you should never share with anyone.
After that create a new file called .gitignore and paste the following:
db.sqlite3
*.pyc
This will make sure that the database is not uploaded to our server and that no pyc files are either.
Now you can upload your project to a new github repository (or gitea repository). If you don’t want everyone to have access to your source code make sure to set the repository as private.
If you want to make sure that your source code stays private I recommend you setup a selfhosted gitea instance, read Selfhost your own gitea instance - selfhosted, lightweight github alternative, to learn how to do that.
git init
git branch -M main
git add .
git commit -m "initial commit"
git remote add origin https://...
git push -u origin main
Now that you we have done that you should login to your server
Server setup
Before configuring anything make sure that you don’t allow any ssh logins with a password. Follow Securing ssh with Key-Based authentication to secure your server from those kinds of attacks.
Login to your server
ssh user@server.ip
Make sure that your packages are up to data
sudo apt update && sudo apt upgrade
Now install python, pip, git and nginx
sudo apt install python3 python3-pip git nginx
Now clone your project into your home directory.
git clone https://...
cd my-project
Once you’re in install the following:
pip install django django-crispy-forms
Now try to run the project:
python3 manage.py runserver
if you get an error that a package is missing install it and re run.
Configuring gunicorn
Now we will setup gunicorn
First install it
pip install gunicorn
Now create a new file called gunicorn.service with your favorite text editor:
sudo vim /etc/systemd/system/gunicorn.service
And paste the following:
[Unit]
Description=gunicorn daemon
After=network.target

[Service]
User=YOURUSER
Group=www-data
WorkingDirectory=/home/YOURUSER/PROJECT
ExecStart=/path/to/gunicorn --access-logfile - --workers 3 --bind 127.0.0.1:8000 PROJECTNAME.wsgi:application

[Install]
WantedBy=multi-user.target
Change YOURUSER to your user.
To find the path to gunicorn run:
which gunicorn
And your project name is the name of the folder inside of your project that contains the settings.py file.
Now run the following commands to start and enable gunicorn (start on boot)
sudo systemctl daemon-reload
sudo systemctl start gunicorn.service
sudo systemctl enable gunicorn.service
Now if you head to 127.0.0.1:8000 you should see your project running.
But were not finished yet
Setting up nginx
Now we need to serve our static content via nginx.
First create a new file nginx configuration file with your favorite text editor:
sudo vim /etc/nginx/sites-available/PROJECT
Change PROJECT to whatever you want
Now paste the following content:
server {
    listen 80;
    server_name YOURDOMAIN;

    location /static/ {
	alias /var/www/staticfiles/;
    }

    location / {
        proxy_pass http://127.0.0.1:8000;
        proxy_set_header Host $host;
        proxy_set_header X-Real-IP $remote_addr;
        proxy_set_header X-Forwarded-For $proxy_add_x_forwarded_for;
        proxy_set_header X-Forwarded-Proto $scheme;
    }
}
Just change YOURDOMAIN to the domain that this will be hosted on.
Create a symbolic link to enable your website:
sudo ln -s /etc/nginx/sites-available/PROJECT /etc/nginx/sites-enabled/
Start and enable nginx:
sudo systemctl start nginx
sudo systemctl enable nginx
Setup static files
The first thing you will have to do is cd into your (django) project
cd project
Now run the following command:
python3 manage.py collectstatic
This will create a new folder called staticfiles
Now to set up the static files we have two options:
- Change the user in
/etc/nginx/nginx.confto your user (less secure) - Copy over the staticfiles to
/var/www/(more secure)
I will be doing the 2nd option:
First create a new file called staticfiles in /var/www
sudo mkdir -p /var/www/staticfiles
Now copy over all of the staticfiles from your project there:
sudo cp staticfiles/* /var/www/staticfiles
Now cd into /var/www
cd /var/www
Change the ownership of all the files
sudo chown www-data:www-data staticfiles
sudo chown www-data:www-data staticfiles/*
Restart the nginx service:
sudo systemctl restart nginx
Now if you head to:
127.0.0.1
You should see your website running with all of the static files being served!
Exposing via cloudflare tunnels
Now to make your website publicly accessible.
To do this you will need a cloudflare account and a domain pointed to cloudflare.
First head to the Zero Trust Dashboard
Under Networks click on Tunnels and then Create a tunnel
Once created you should Install and run a connector, follow the instructions on the page for your specific setup.
After the connector is running you should click on the Public Hostname tab and Add a public hostname.
Now you should see something like this:
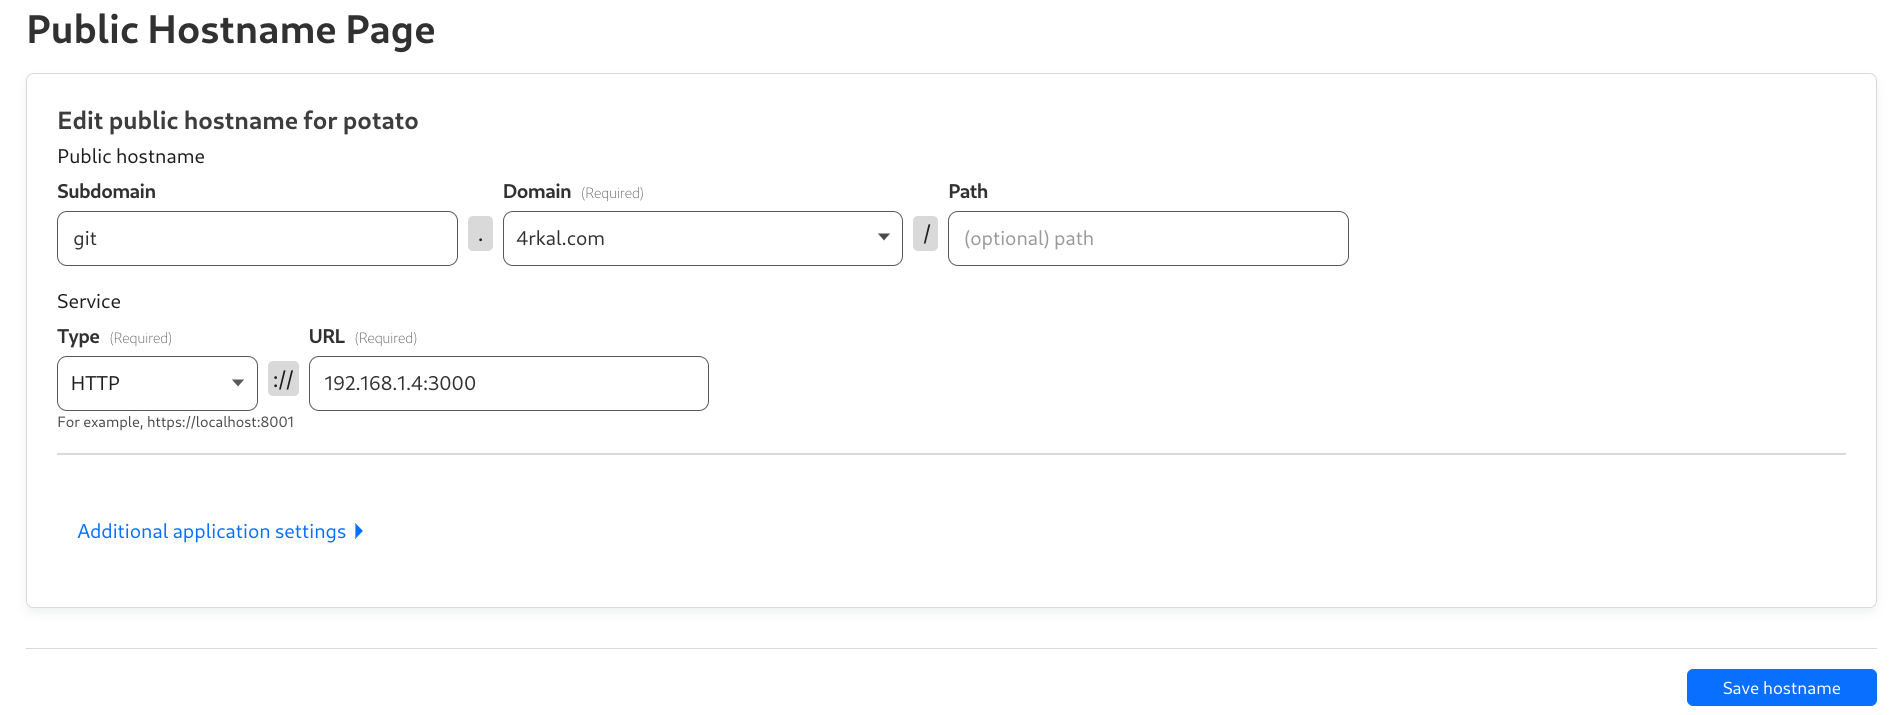
Fill in the info as I have.
The service type should be HTTP and the url should be 127.0.0.1:80 or localhost:80
Now if you head to the domain that you specified you should see your app up and running.
Congratulations!
If you enjoyed this post and want to support my (mostly unpaid) work , you can donate here.